
Stop Deliverability Regressions with Google Postmaster Setup for B2B
Stop Deliverability Regressions with Google Postmaster Setup for B2B
Go to Postmaster, sign in with a Google account or Workspace login, and click “Add domain.” You’ll need DNS access to your sending domain and either the DKIM d= value or the SPF Return-Path domain, since that’s what determines whether Postmaster Tools tracks the right authenticated stream. Once you verify with a TXT or CNAME record, expect dashboards for spam rate, domain reputation, and authentication to populate over the following days.
TL;DR:
- Verifying the correct domain, matching the DKIM
d=or SPF Return-Path, is crucial to see relevant data in Postmaster dashboards; adding the root website domain often results in little or no insights.- DNS record propagation can delay verification, so waiting several hours or reattempting after regenerating tokens is sometimes necessary to resolve verification failures.
- Maintaining high spam rate levels or low authentication pass rates signals immediate issues with list hygiene or DNS configurations that should be addressed before technical fixes.
- Monitoring should be routine: check spam rates daily and authentication weekly, as these metrics are more immediate indicators of deliverability health than reply or open rates.
- Postmaster data only covers emails sent to personal Gmail accounts, not Google Workspace inboxes, which limits the scope of reputation and deliverability insights for organizations using Workspace.
Table of Contents
- Setting Up Google Postmaster: Adding Your Domain and Verifying DNS
- What Each Google Postmaster Tools Dashboard Actually Shows
- Reading the Metrics: What to Fix First
- Fixing Common Google Postmaster Setup Problems
- Practitioner Notes on Running Postmaster as an Early-Warning System
- Why I Trust Postmaster Data Over Gut Feel
- How Lickfold Digital Handles Deliverability Setup and Monitoring
- Sources
- FAQ
Setting Up Google Postmaster: Adding Your Domain and Verifying DNS
Google Postmaster setup takes about ten minutes of active work, but the verification and data collection that follow take longer. Here’s the exact sequence.
- Sign in and add a domain. At postmaster.google.com, sign in with the Google Account you want tied to the dashboards, then click “Add new domain” (or the plus icon if you already manage other domains).
- Pick the right domain. This is where most setups go sideways. Enter the domain that matches your DKIM
d=value or your SPF Return-Path domain, not just your company’s root website. If you send frommail.yourcompany.combut only addyourcompany.com, the dashboards will show little or nothing useful, since Postmaster ties reputation and authentication data to the exact domain your mail authenticates against, according to a Mailtrap walkthrough on common setup mistakes. - Verify ownership. Postmaster gives you a TXT or CNAME record to add in your DNS provider. Copy it exactly, paste it into your DNS zone, save, and click “Verify” in Postmaster. Google’s own setup instructions walk through both record types.
- Wait out propagation. Verification is often quick, but DNS changes can take anywhere from a few minutes to several hours to propagate fully, per Google’s Postmaster product page. Don’t panic if “Verify” fails on the first try, especially right after saving the record.
- Add teammates if needed. Under “Manage users” for a verified domain, you can invite colleagues, but every invited address must already be a Google Account, and the domain has to be verified first, according to Google’s official setup guide. If you’re coordinating dashboard access across an internal team or an outside partner handling deliverability, tools built for agency collaboration workflows can help keep permissions organized as more people need visibility.
If you run multiple sending domains or subdomains, add each one separately. Postmaster doesn’t roll subdomain data into a parent domain’s dashboard automatically.
What Each Google Postmaster Tools Dashboard Actually Shows
Once verified, Postmaster Tools splits your reputation data into eight dashboards. Each one answers a different question about how Gmail sees your mail, but they all share one limitation worth remembering: the data covers only messages sent to personal Gmail accounts, not Google Workspace inboxes, according to Google’s dashboard documentation.
- Compliance status flags whether your domain meets Gmail’s basic sender guidelines around authentication and spam rate.
- Spam rate tracks the percentage of your mail that Gmail users mark as spam. A red flag here (spikes above Gmail’s low threshold) usually means a list hygiene or consent problem, not a technical one.
- Domain reputation and IP reputation show trust scores at the domain and IP level, useful for isolating whether a problem follows your brand or a specific sending infrastructure.
- Feedback loop surfaces individual spam complaints tied to campaign identifiers, if you’ve set those up.
- Authentication reports SPF, DKIM, and DMARC pass rates.
- Encryption shows what portion of your mail is transmitted over TLS.
- Delivery errors logs the SMTP error codes Gmail returned when rejecting or deferring your mail.
Most dashboards let you look back anywhere from 7 to 120 days. A properly configured domain typically shows high authentication pass rates, per Google’s own guidance; anything meaningfully below that deserves a closer look at your SPF and DKIM records. Keep in mind that dashboards need a minimum volume of Gmail-bound mail before they’ll show data at all, so a low-volume sender may see empty charts even with a clean setup.
Reading the Metrics: What to Fix First
Not every red flag deserves the same response. Here’s the priority order that actually moves the needle.
- High spam rate: Check consent and list hygiene before touching anything technical. Gmail users mark mail as spam for reasons that have nothing to do with your DNS records, most often because they don’t remember opting in.
- Domain reputation dropping while IP reputation stays fine: This usually points to content or engagement issues across your whole sending program. Review messaging and reputation management practices rather than assuming an infrastructure problem.
- IP reputation dropping while domain reputation holds steady: Isolate the affected sending IP and consider a proper warm-up sequence before resuming full volume on it.
- Authentication failures: Double-check SPF includes all sending sources, DKIM keys match what your mail server actually signs with, and DMARC policy aligns with both. A single misaligned DKIM selector can tank pass rates without any obvious error elsewhere.
- Delivery errors: Common Gmail SMTP codes like 421 (temporary rate limiting) or 550 (permanent rejection, often reputation related) point to different fixes. A 421 usually resolves by slowing send rate; a 550 means Gmail has already flagged something structural.
Pro Tip: Fixes don’t show up instantly. Give Postmaster dashboards several days to a full week after a change before judging whether it worked. Gmail’s reputation scoring is a rolling assessment, not a real-time switch.
Fixing Common Google Postmaster Setup Problems
Most Postmaster setup failures trace back to one of three issues.
- DNS token not found. Confirm the record type (TXT vs CNAME) matches what Postmaster requested, and check the host or name field, since many DNS providers expect
@for the root domain rather than the full domain name. Extra quotation marks around a TXT value are a frequent culprit too, according to Mailtrap’s troubleshooting notes. If it still fails after confirming the record is correct, wait for propagation and try again, or regenerate the token and start fresh. - No dashboard data after verification. This usually means you added the wrong domain (organizational domain instead of your actual DKIM or Return-Path subdomain) or your Gmail-bound volume hasn’t hit the minimum reporting threshold yet.
- Can’t add a user. The invited email address needs to already be a Google Account. Before escalating any issue to support, capture the exact DNS record text, a screenshot of the error, and the precise domain you’re trying to verify.
For DNS work generally, a dedicated technical SEO and DNS toolkit can speed up checking propagation and record formatting across providers.
Practitioner Notes on Running Postmaster as an Early-Warning System
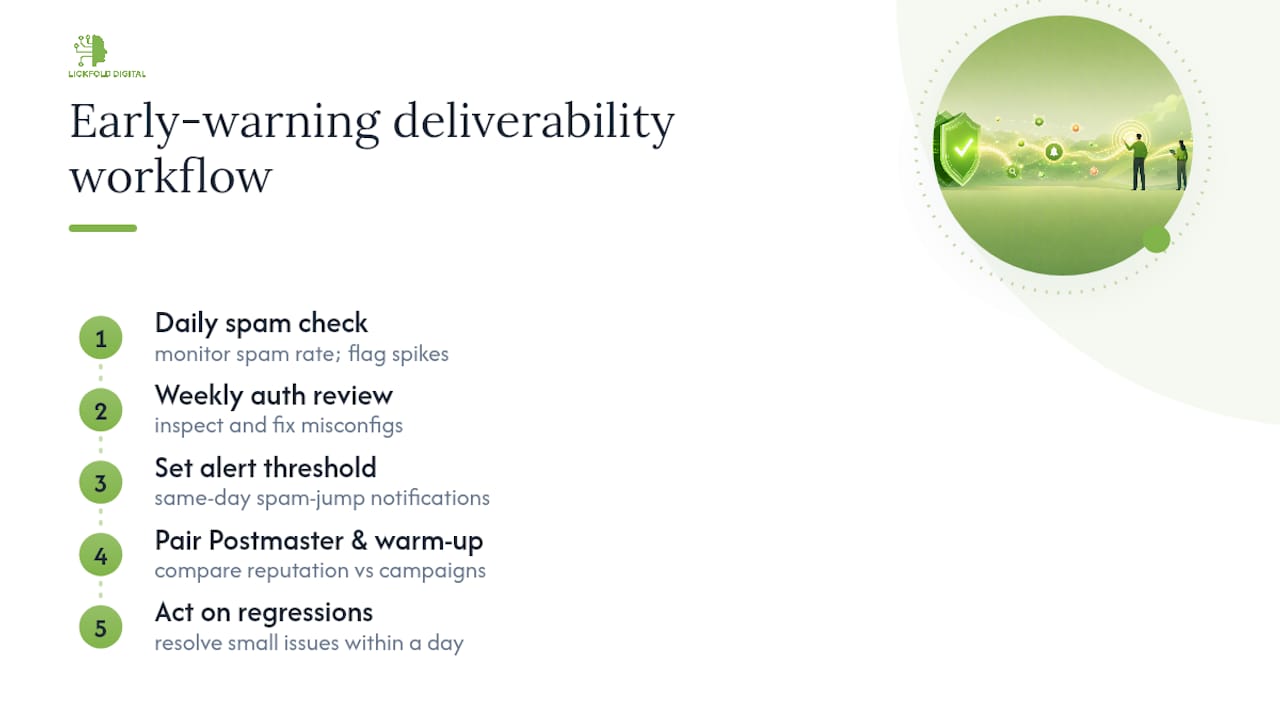
Setting up Postmaster is the easy part. Using it well means building a routine. Check spam rate daily, since it moves fastest and signals problems before reputation scores catch up. Review authentication weekly, since misconfigurations there tend to be slow leaks rather than sudden breaks. Set an internal alert threshold, so a spam-rate jump gets flagged the same day rather than discovered during a monthly review.
The deliverability workflow ties Postmaster data directly to dedicated warm-up accounts, watching reputation shifts against active outbound campaigns rather than in isolation. That pairing is what catches a regression while it’s still small enough to fix in a day, not a month.
Why I Trust Postmaster Data Over Gut Feel
Reply rates and open rates lag. Spam rate doesn’t. In practice, a spike in Postmaster’s spam-rate chart shows up before campaign metrics start looking off, which gives you a head start on the fix instead of a postmortem. One sudden jump traced back to a stale list segment that hadn’t been pruned in months, a five-minute fix once the dashboard pointed at it. Pair the setup here with a recurring weekly check, and the resources linked throughout this guide, and you’ll catch most problems while they’re still small.
— Duarte
How Lickfold Digital Handles Deliverability Setup and Monitoring
If reading through DNS records and dashboard definitions sounds like more time than your team has to spare, a service can build and monitor this infrastructure as part of outbound deliverability. That includes dedicated warm-up email accounts, ongoing reputation monitoring against Postmaster and other signals, and human qualification of replies so your sales team only sees conversations worth having.

The process runs in four stages: an audit of your current sending setup, infrastructure and DNS configuration, a structured warm-up period, and continuous monitoring once you’re at full volume. For B2B senders running outbound at scale, that monitoring catches a reputation dip while it’s still a minor fix, not a domain-wide problem. If you’d rather have this handled than manage it yourself, see how Lickfold Digital sets up and protects sending infrastructure and get a read on where your current setup stands.
Sources
For the exact setup flow, start with Google’s Postmaster Tools setup guide and its dashboard reference. For real-world verification pitfalls, Mailtrap’s Postmaster walkthrough covers cases the official docs skip. For deeper deliverability fixes once Postmaster flags an issue, see this guide to improving B2B email delivery.
- Set up Postmaster Tools - Gmail Help
- Postmaster Tools by Gmail
- Google Postmaster Tools — Mailtrap blog
FAQ
Is Google Postmaster Tools Free?
Yes. Postmaster Tools is free for any sender that sends mail to personal Gmail accounts, according to Google’s product page.
What Are the SMTP and IMAP Settings for Gmail?
Gmail’s SMTP and IMAP servers require authentication and secure connections; these settings apply to sending or reading mail through Gmail itself, separate from Postmaster Tools setup.
How Do I Set Up Gmail for My Domain Name?
You connect a custom domain to Gmail through Google Workspace, verifying domain ownership via DNS, then add that same domain to Postmaster Tools separately to monitor its deliverability once mail is flowing.
How Do I Enable SMTP for Gmail on My Device?
In your email client or app, enter Gmail’s SMTP settings and authenticate with an app password or OAuth, since Google generally blocks plain password logins for third-party apps.
Why Doesn’t My Postmaster Dashboard Show Any Data?
Usually it’s one of two things: you added the wrong domain (not matching your DKIM or SPF Return-Path domain), or your Gmail-bound sending volume hasn’t reached the minimum threshold Google needs before reporting, per Google’s Postmaster documentation.